Black Ops 2 Buried How to Get Booze
Welcome to my guide!
Hey everyone and welcome to my first Steam guide and my Buried walkthrough/tutorial guide! In this, I will cover some of the new aspects of Buried that might confuse newcomers and that certainly confused me the first time I jumped into this awesome map! This sadly won't include the easter eggs for Richtofen and Maxis but if I have any extra time, I might just throw them in here.
About myself, I am a somewhat seasoned BLOPS 2 zombies player that knows how to handle himself in a pinch. But, as the G.I Joe cartoons said, "Knowing is half the battle." In order to make the most out of this new Zombies map, you need to know the layout of the map, how the booze, candy, and keys work, what your new big friend can do (for the purpose of this Guide, I will just call him The Giant), and much more!
A good amount of content of this guide will be linked to other webpages and taking images from other major Zombies guides, so if there is any copyright stuff I need to know about, let me know.
All criticism is greatly appreciated, and without further ado, lets jump in!

Buried Map Layout
The map of Buried is too intricate to explain in this guide without boring you (the reader), so I'm just going to leave it to pictures to save the day and explain only the critical parts of it. The most important thing about this map is TEAMWORK. This map emphasizes it more than any map prior to it, so make sure before you do something on Buried that might be non-reversible, let your teammates know!
I found this website a while back that somewhat helps with the map's layout. It details every single part of the map, including the very annoying tunnel system, but I found that the best way to figure out this map is to just run around it yourself (I'm a visual learner, so that might be why).
STARTING AREA
http://codzombified.blogspot.co.uk/2013/07/buried-resolution-1295-map-layout-call.html
The most important thing that I wanted to talk about in this section is in the starting area. I have found there to be three types of people when starting Buried: The ones who normally kill zombies, the ones who maximise points, and the ones who instantly jump into the hole to get to the mystery box. I am totally fine with all 3 of these people, yet I would like to point out the LSAT.

STREET LAYOUT
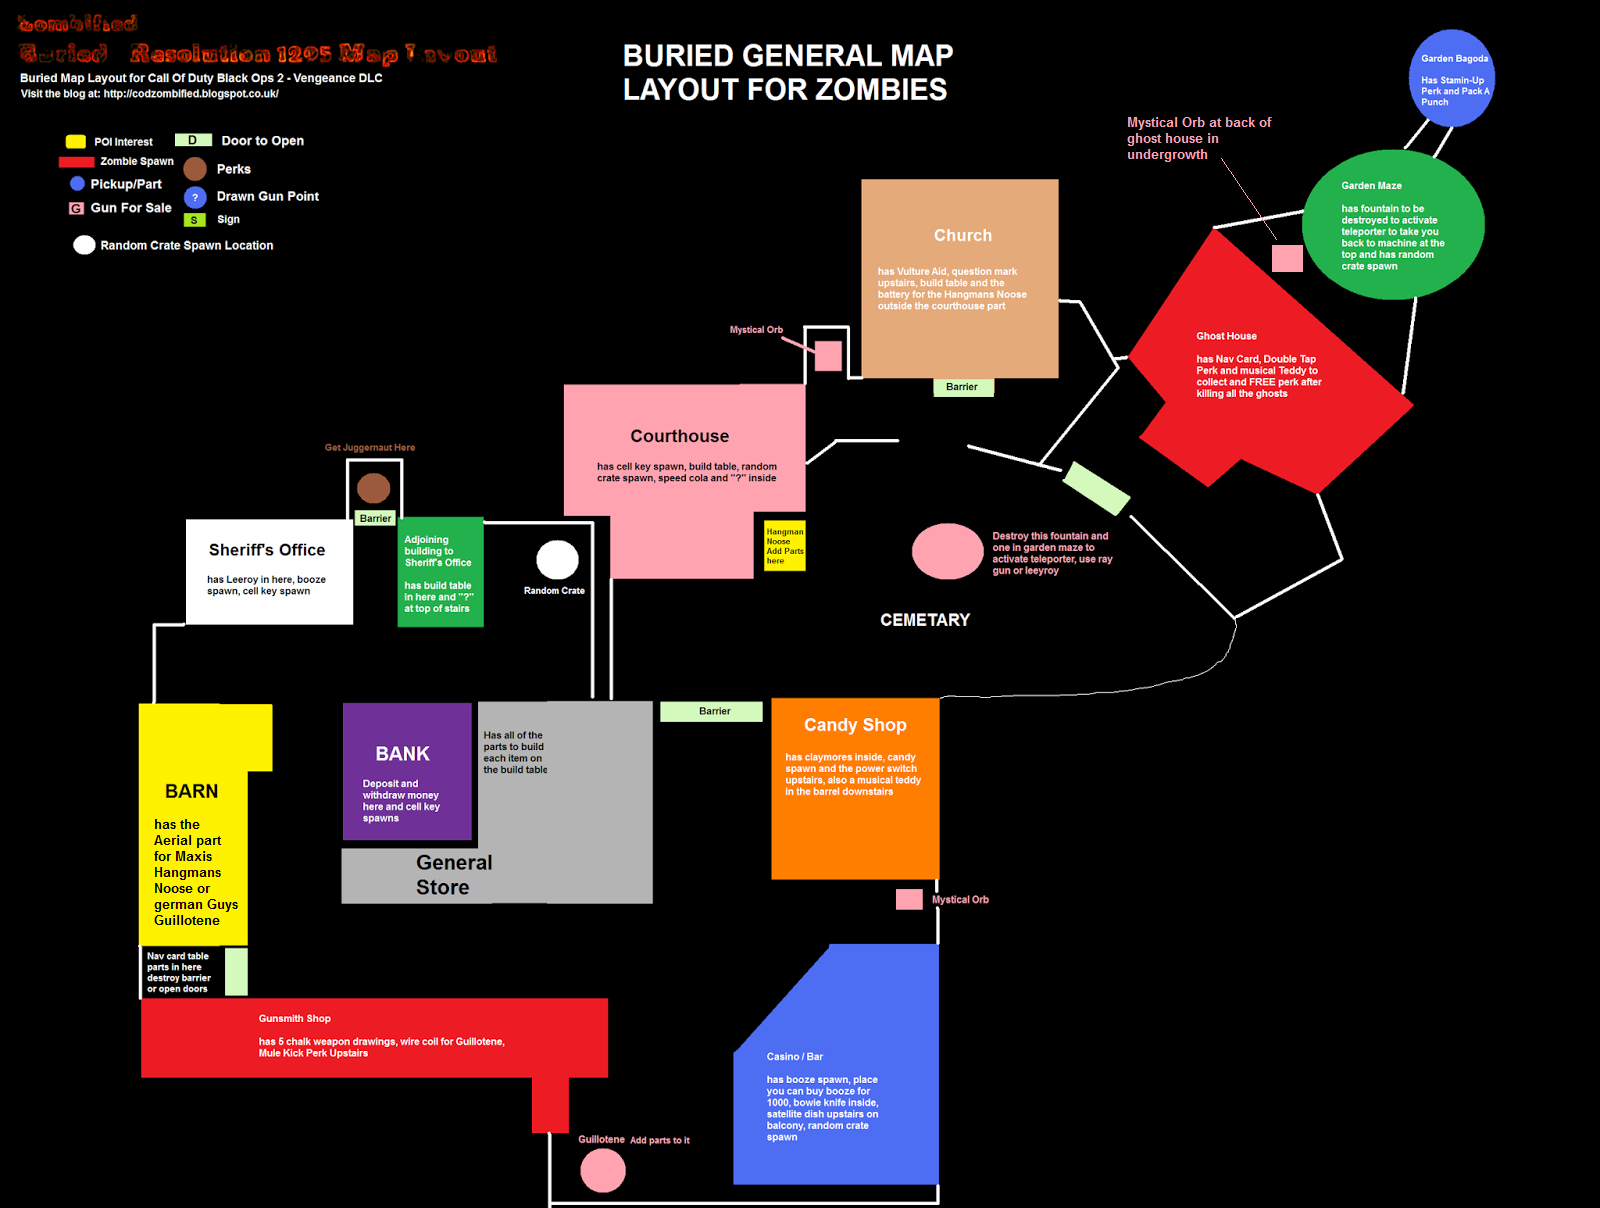
This handy-dandy map helps layout the streets of the underground Wild West town and where most of your action is going to happen. Don't forget that the general store has 90% of the parts needed for buildables. I will talk about the barriers in another section.
THE HAUNTED MANSION
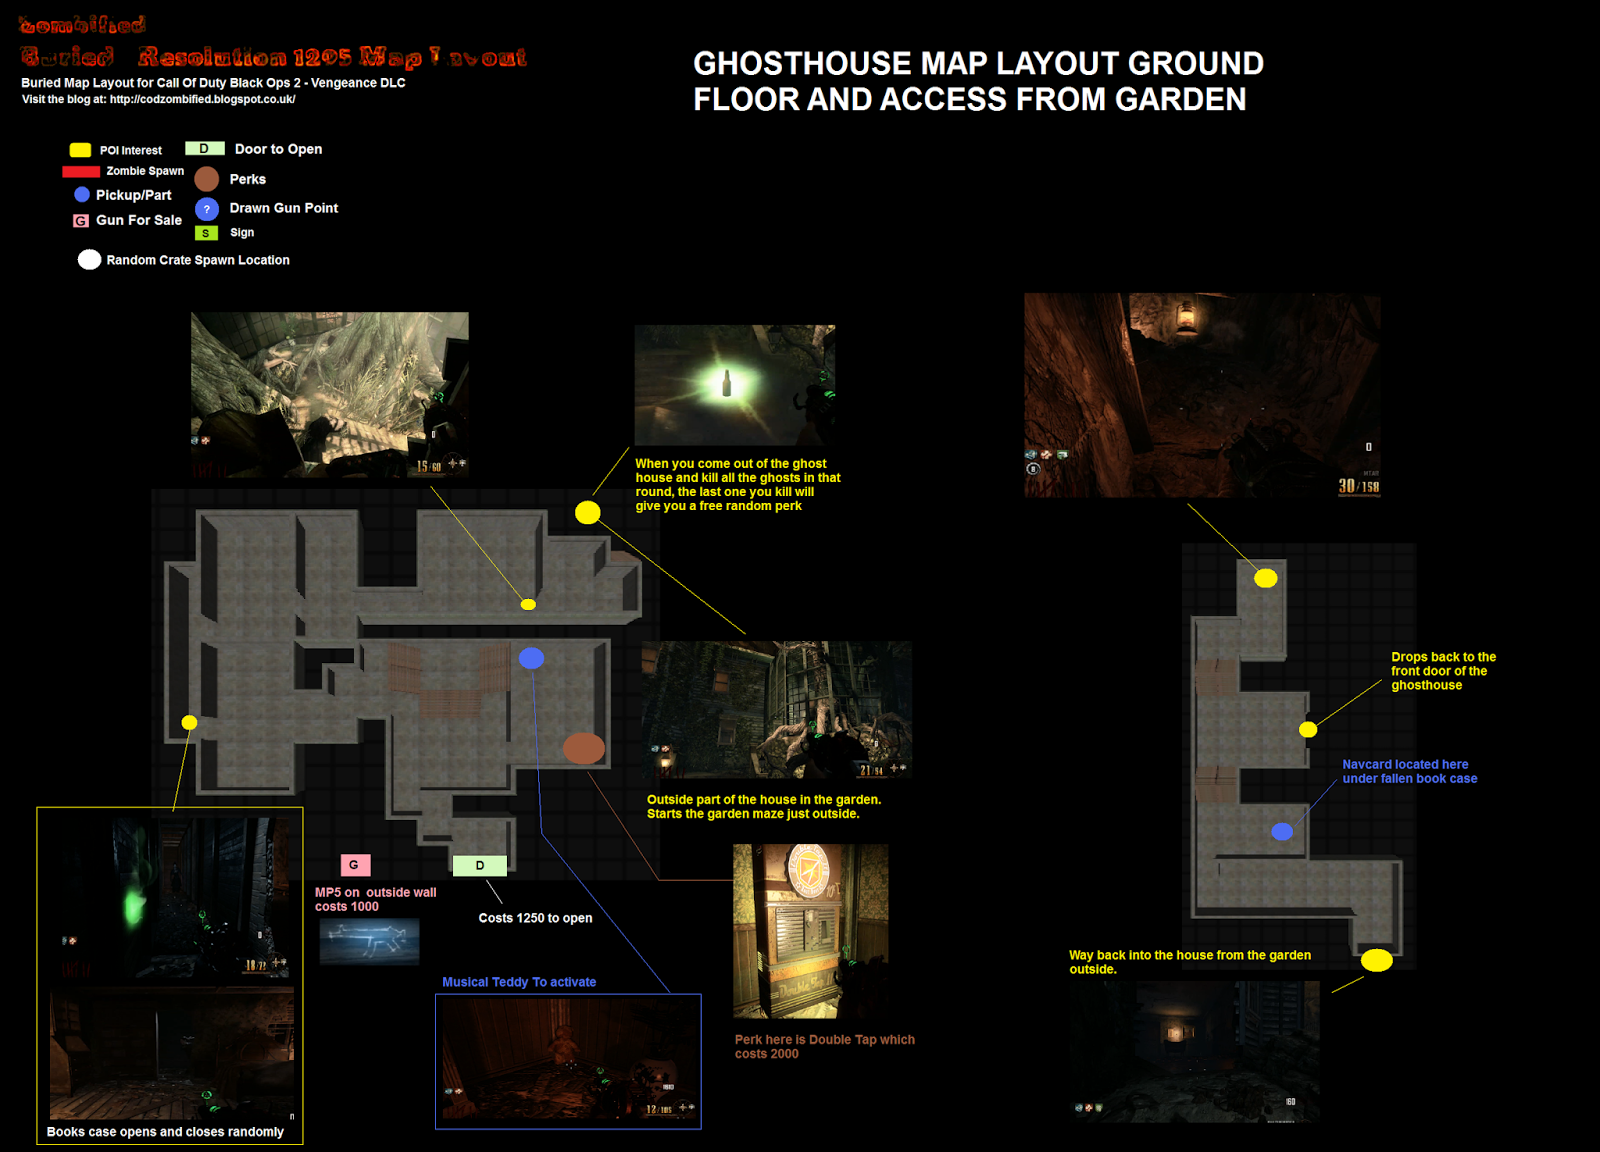
I think the only reason I would explain this section is because of how annoying the ghosts are. The only reason you ever need to go inside this building is to get through it and for Double Tap, since the ghosts take away 2000 of your credits when they hit you.
THE MAZE
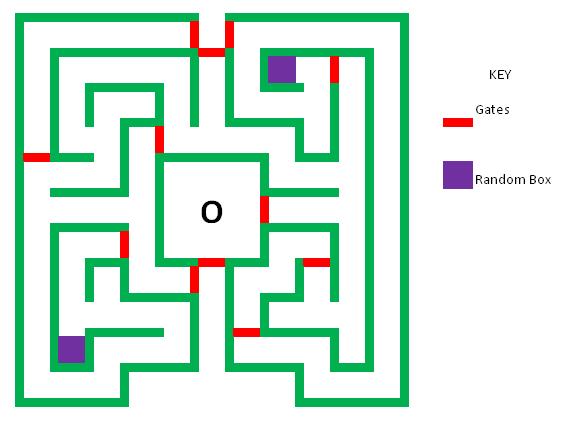
The maze is also another part of the map that you can only really get the hang of by playing it yourself, especially since those gates move every 10 seconds (according to COD wiki, evidence may be needed)! Only reason you would need to stay in the maze is to get to the center to teleport back to the spawn. To do this, you first must get the Giant to break the fountain outside of the church with candy, then use an explosive weapon to blow up the fountain in the maze, then jump into it!
I might expand on this section of the guide if need be, but until then, the website has all the maps of each section of Buried, so go and explore!
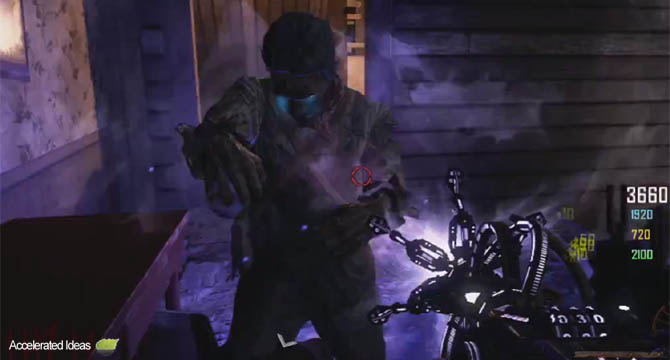
Your Jolly Redneck Giant
Because what is a classic Wild West town without the local freakshow? But be warned, what the Giant lacks in voice, he makes up for in skills! The three main tools in Buried that affect the Giant are Keys, Booze, and Candy.
The Keys to my Heart

The only other time you will need keys are if you damage the Giant too much with gunfire (if you just melee him, he will run faster). At a certain point, he will run back to his cell and lock himself in (silly giant, making exploring the map a pain in the ass). The website below details the spawn points for the key after the first unlocking.
http://edsaterstad.hubpages.com/hub/Key-Locations-for-Buried-Call-of-Duty-Black-Ops-2-Zombies
Woozy Boozy

http://edsaterstad.hubpages.com/hub/Booze-Locations-in-Buried-Call-of-Duty-Black-Ops-2-Zombies
At the start of each round, unless someone is holding some Booze, a new jug of booze will spawn in the saloon. If the spawned booze is used in the round and you need more of it, you can buy it from the tap in the saloon for 1000 points.
The trick to the booze is that you always get points for breaking barriers around the map. The longer the Giant runs to the barrier, the more points you get when he smashes it. For example, giving him the first booze in his cell only gives you 200, but if you go from jugg to the gun store and then from the inside of the gun store ALL THE WAY to jugg, you can get over 1500 points! Great early game money if you ask me!
O, Piece of Candy! O, Piece of Candy!

http://edsaterstad.hubpages.com/hub/Candy-Locations-in-Buried-Call-of-Duty-Black-Ops-2-Zombies
As far as I know, the candy spawns the same way as the booze, except in the Candy Store (who knew?) All the things that the Giant can do with Candy include the following:
-If given to him in the open with some zombies around, he will start smashing the ♥♥♥♥ out of them.
-If given to him next to a crawler, he will pick up the crawler and it will live indefinitly (someone find evidence of this please?). To make him kill the crawler, just shoot the Giant and he will curbstomp the zombie into the dirt!
-If given to him next to a building station/workshop, he will spend some time (1-3 minutes) running around the map obtaining the parts to build it for you! Not sure if the doors need to be open to certain areas to get the certain parts, and also if he is shot enough to go back to his cell during this process, he will stop building the machine and leave it half-built.
-If given to him next to a closed mystery box, he will lock it into place for a long time/indefinitly (evidence needed)
-If given to him next to an open mystery box with a weapon out, he will reroll the weapon to give you a second chance on it!
-If given to him next to a mystery box location that the box isn't currently at, he will run and get the box and move it to the location you picked. Not sure if this resets the boxes timer (needs evidence).
-If given to him next to a power-up lying on the floor, he will reroll the power-up.
-If given to the him in the Armory in front of all the chalk drawings, he will grab 3 of them and place them around the map. BUT you will not get the credit bonuses for each one (aka you won't get 1000 points each time he places them around the map [more details on Chalk in a later section]). Credit to Aryajmarya for this one!
-There are some ideas/rumors that he can also revive players when they are downed, but I also need some evidence for this.
Make sure you communicate with your teammates so you know where the candy is at at all times! It is a very important tool that really makes the Giant shine!
The Wonderous Weapons there be
In this DLC, there are 3 new weapons and 1 new equipment, each with their own awesome powers, and some with downsides.
The Ray Gun Mark II

Probably the coolest of the 3 weapons introduced, the Ray Gun Mark II works similarly to its predecessor, except with some major differences. Instead of firing 1 shot at a time that is explosive, it fires 3 rapidly that have a high penetrating ability and no explosion. Pack-A-Punching this turns it into the Porter's Mark II Ray Gun, which gives double the magazine size, an increased ammunition bank, more damage, and red shots instead of green. The somewhat downside of this weapon is that having it stops you from obtaining the original Ray Gun and vice-versa, so make sure you make up your mind about taking one or the other. The upside is that it has been made available on all Zombies maps (Tranzit super trains anyone?)!
The Paralyzer
The second coolest weapon introduced (only second because its only on this map), the Paralyzer is a very unique weapon that offers a great playstyle to certain players. First off, it does not have any ammo, and uses a cooldown timer that increases when you use it and maxes out at 115 (the counter is shown on the corner of the weapon.). When being fired, it slows zombies until they stop and explode. It can also be used to fly by pointing it downwards and firing. BUT BE WARNED, it works more like a hover device than a flying device, so don't expect it to instantly break your fall, so use it to go up slowly AND come back down slowly, otherwise you are going to get downed and ruin your game. Pack-A-Punching this turns it into the Petrifier, which just gives it a slower overheat. This gun is very useful for accesing parts of the map you don't want to spend credits on yet and to train in very interesting new ways.
The Remington New Model Army

A kickass looking weapon. I can't really describe it more simply than the COD wiki has, so I'll just take it straight from there. "It is functionally equivilant to the Python, but with the ability to reload all six rounds at once. It is slightly weaker than the Python, losing much of its effectiveness at round eleven, but has higher chest and head multipliers when Pack-a-Punched.
When Pack-a-Punched, it becomes the Sassafras and is effective until rounds in the 40s. The magazine size is doubled to twelve rounds and reserve ammunition is increased." A very simple weapon in all that helps all round.
The Troll..I mean Time Bomb
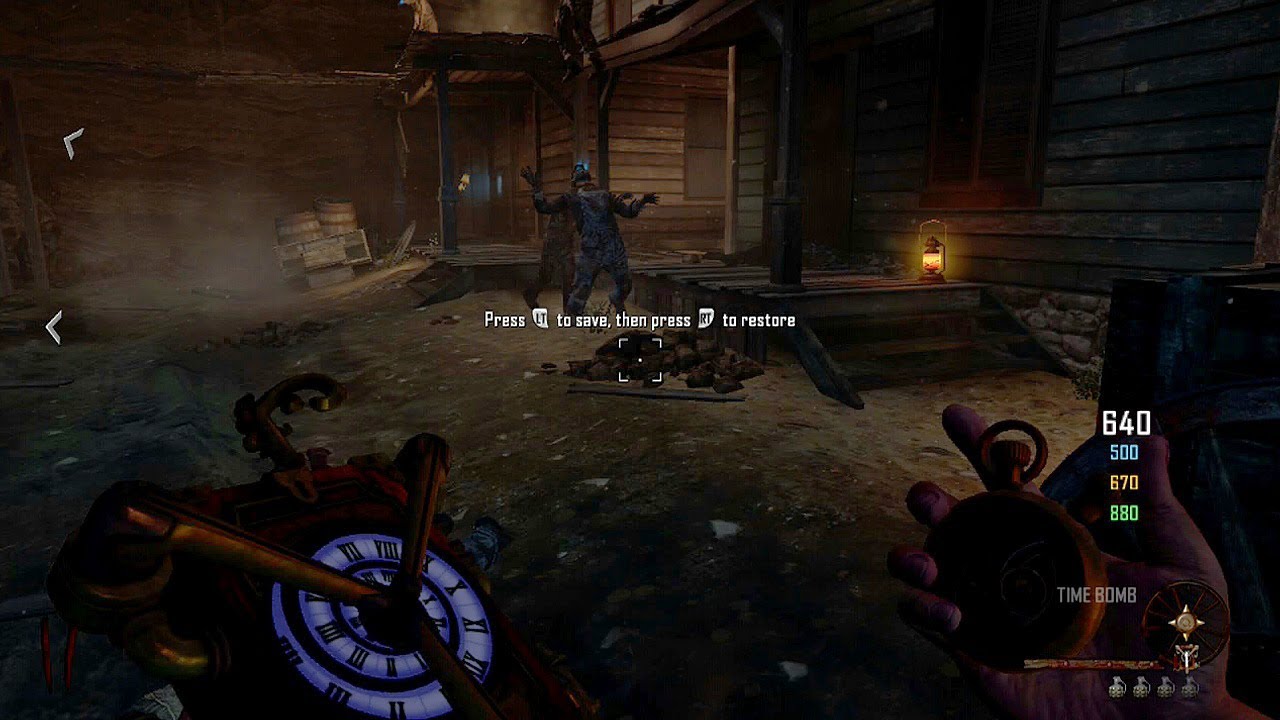
This thing can make games and it can also break them entirely. Placing it and using it works like a C4, yet acts entirely differently. When placed, an icon will appear above the round timer that signifies what round the game will be reversed back too. When activated, EVERYTHING on the map and the charcters weapons, perks, and points will be reset back to when the bomb was placed, except doors that have been opened, barriers smashed by the Giant, buildables being built, and easter egg progress. THE ONLY 2 REASONS YOU SHOULD EVER USE THIS ARE:
-To place it quickly when everyone else gets downed as it will revive them.
-(More complicated) take money from the bank, open the doors you needs, then reverse time. This will put all the money back into the bank, yet keep all the doors you opened open.
Chalk Wallbuys: Gotta do it all yourself!

Yet again, COD wiki to the rescue!
"Custom placement of certain weapons onto predefined spaces by using chalk found on the wall. Each chalk placed will give the player 1000 points (the final chalk rewards 2000 points). These will be doubled if the Double Points Power-Up is active."
You can find these chalks in the gun store and the question marks around the map. Use them wisely to get nice early game cash and to keep the weapons you need to train close to you at all times!
The Powerful New Perk!
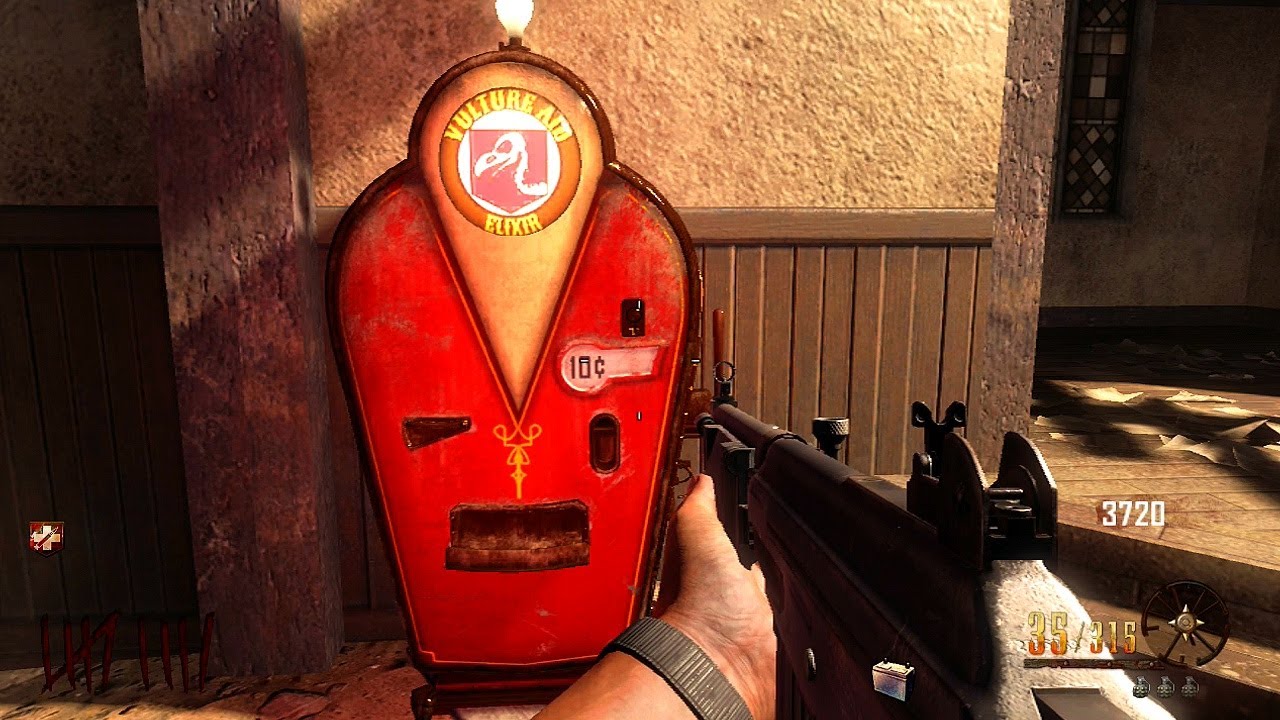
A great new perk that everyone should get right after Juggernog, Vulture Aid Elixir costs 3000 points and can be located in the back of the church.
Just like with the Remington, I think the COD wiki can explain this better than I can.
"When a player has Vulture Aid:
-They will be able to see perks, wall weapons, places to draw chalk wallbuys, and the mystery box through walls over a short distance.
-Zombies will ocasionally drop small packets of ammo (approximately 10% of a weapon's magazine size) or points (between 5 to 20 points). These only effect the player's currently equipped weapon.
-Certain zombies will release a cloud of green gas upon death, which will cause players standing inside it to be ignored by other zombies. Such zombies can be noted by the green cloud emanating from them.
-Zombie's eyes, Perk machines, the Mystery Box and the Pack-a-Punch machine all have a brighter glow to them that makes them more easily visible.
While standing inside a gas cloud, the player's vision and hearing will be distorted and muffled. As the effect of the cloud begins to take place, the perk icon in the lower-left portion of the screen will begin to glow and emit a green smoke cloud. Even after the player has left the gas cloud, zombies will ignore him or her for as long as the perk icon is glowing."
Not much else to say about this awesome perk.
Time to End this
I hope you enjoyed this guide and I hope your adventures in Buried will now be more fun because of it! All picture and some information credit where it's due, and as I said before, I appreciate all criticism to make this guide great! If demand is great enough, I might put in the Easter Eggs for both sides, but I'm too tired to do it right now :) Good luck and happy Zombie hunting!

Black Ops 2 Buried How to Get Booze
Source: https://steamcommunity.com/sharedfiles/filedetails/?id=166017750